DIY Almond Butter

So today I was looking for plain all natural almond butter, no added palm oil, vegetable oil, cane sugar, or salt– just almonds! It was tough to find, Justin’s Classic Almond Butter was about the closest with only added Palm Fruit Oil, which apparently is a mix of saturated and unsaturated fats and free of trans fat. It functions as a preservative for the almond butter.  So I decided to make my own almond butter.  It was actually quite a simple and quick process that I would recommend if you are a nut butter person or just want to try something new.

I started with 1 cup raw almonds in my food processor.  I ran the processor at 30 second increments; in between scraping the edges of the processor where the almond “dust” had built up.

Check out my youtube clip on the art of scraping the sides of the food processor:

After about 3-4 minutes of food processing I noticed the almonds could use a little moisture, so I added 2 Tbsp of olive oil and continued blending. Once I added the olive oil, the almond butter quickly became a bowl of creamy, nutty deliciousness.  I processed for about 30 seconds longer and then enjoyed my home made almond butter!

The color was lighter and texture a bit different than your store-bought almond butters, but still quite delicious.  After all the food processing, the almonds did get warm so I let the butter cool before putting in my jar.  Store in an air tight container in your fridge it will keep for about 3 months.  I got my bag of raw almonds for $5 on sale at CVS and used about 1/3 of the bag, so this jar cost about $1.66 (almond butter jar that size goes for about $4-5 around me).  That’s savings in my book!


Protein Ice Cream

Like ice cream? But don’t like the carbs, sugar, fat, and dairy that comes with it? With summer rapidly approaching I would like to share my favorite ice cream recipe to beat the summer heat without ruining your summer beach body!

To make this you NEED a good blender, I have a Vitamix which does the trick, but I have tried the recipe in a magic bullet and it cannot handle all the ice.

Here are your ingredients:

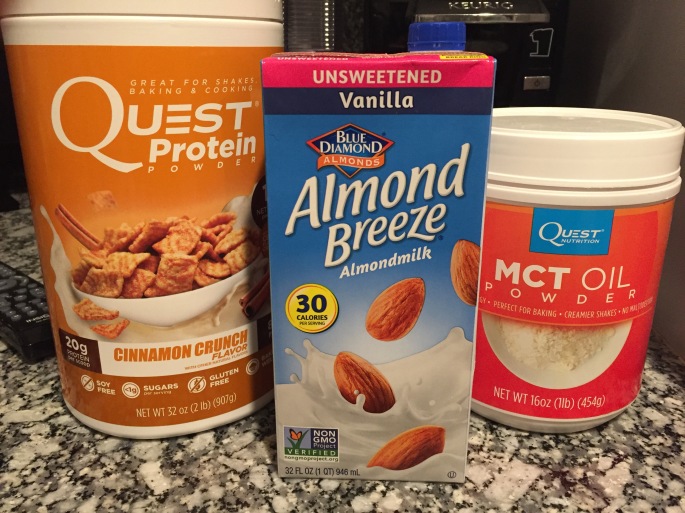
  • 1 scoop of your favorite protein powder (Quest Cinnamon Crunch is my favorite)
  • 1/2 scoop Quest MCT powder (gives a creamy consistency)
  • 1/4 cup unsweetened vanilla almond milk
  • 12 ice cubes51745110312__B79CA6FC-7752-4187-85E3-BE82762787D3

Add protein powder, MCT powder, and almond milk in the bottom of your blender.  Put your ice cubes on top (this prevents an explosion of protein powder when you first start blending).  Put blender on low and using your blender tamper tool to push ice cubes down toward the blender blades.  Continue to do this until the mixture has an ice cream like consistency.  I avoid using the high power on my Vitamix because it creates too much heat which melts the ice cream.

You should be able to flip your blender up side down and the ice cream will stay at the bottom of your blender (as pictured on right).

And voila! you have rich creamy ice cream that is 130 calories of pure deliciousness!  Top with your favorite ice cream accompaniments. I like Whole Foods no sugar added light whip cream and a little cinnamon, a handful of almonds, or even a few rainbow sprinkles!  icecream

Nutrition facts: Calories- 130cals, Protein-20g, Carbs-6 g, Fiber- 3g, Sugar- 1g, Fat-6g

Jicama Fries

One of my favorite recipes since getting my air fryer is jicama fries.  They make a great side for dinner that feels like a treat, but is really just another veggie! If you have never heard of jicama before (I hadn’t before going on a super low carb diet before my wedding), it is a root vegetable, many grocery stores sell it including Stop&Shop and Big Y, usually near the squash, potatoes, and onions. Trader Joe also sells them pre-cut and packaged in the produce section, in my Trader Joe’s they are next to the berries.

This is what you can look for at the store.  Make sure you check your jicama closely before you buy, sometimes if they are old you can see mold growing on the outside or a sticky liquid on the outside.  When you cut these open the jicama will be be slightly brown and will have a sour flavor (still edible, just not as delicious!).  The best jicama has white meat on the inside and has a fresh taste, I describe it as a mix between an apple, pear, and potato.

Once you are ready to make your jicama fries, make sure you have a VERY sharp knife, peal your jicama and slice into “french fry” shape.

Next put them in your air fryer and spray with your favorite oil spray. I love avocado or olive oil spray. Set to 400 for 12 minutes. After 12 minutes, give your air fryer a shake, re-spray and set for another 10-12minutes. Depending on the thickness of your fry and desired crispiness, you may need more or less time.  You can also use an oven, broil on low with the same technique as described in the air fryer.

Serve with salt, pepper, mustard, ketchup, or enjoy plain.  Better than McDonalds and much better for you!

Nutritional facts (not including oil spray): 1 cup raw jicama- Calories- 46, Fat-0g, Carbs-11g, Fiber-6g, Protein- 1g